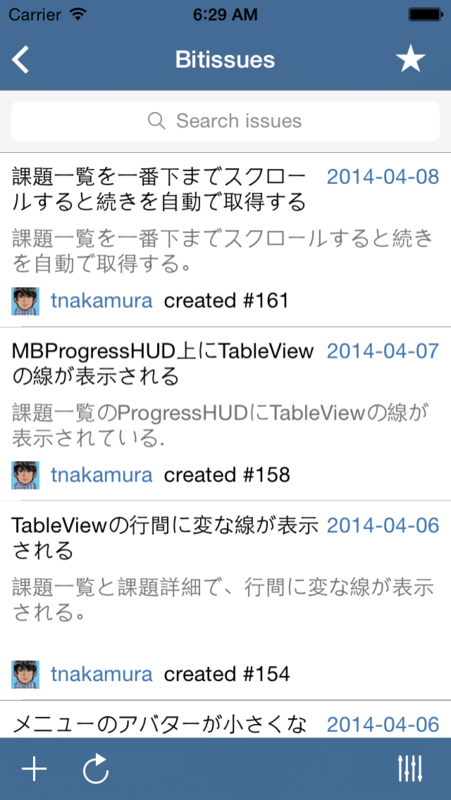
Bitissues を RubyMotion で書き直してリリース

Objective-C で作っていた Bitbucket Issues の iOS クライアント『Bitissues』を RubyMotion で書き直した。 Apple の審査もすんなり通過。 これが初めてリリースする RubyMotion 製アプリになる。

f:id:griefworker:20140415195847p:plain

今回のリリースで、ようやくイシューのステータスを変更できるようになった。 あと、Pull To Refresh や AutoPagerize を実装したり、FontAwesome や IonIcons を使って、 今どきな UI に近づけてみた。

せっかく Objective-C で作っていたのに、なぜ RubyMotion で書き直したかというと、 Objective-C では開発を続けるモチベーションが沸かなかったから。

Objective-C は着々と進化して記述が簡単になっているし、 Xcode の入力補完やデバッガのおかげで生産性は高い。 ただ、Objective-C がどうも肌に合わなかった。 ならばいっそ、書いてて不思議と楽しく感じる RubyMotion で書き直してしまえ、となって今に至る。

この「楽しい」とか「合う」といった肌感覚は重要だと思っていて、プライベートプロジェクトにとっては死活問題。モチベーションが沸かずそのまま頓挫、なんてことになりかねないし。

まぁ、RubyMotion の更新費用1万円を捻出できずに、開発を継続できなくなる可能性はある。 そのときはソースコードを公開するなり、また Objective-C に戻るなりすればいいか。 RubyMotion と Objective-C 間で SDK やライブラリの知識を共有できるのは幸い。

UITableView のセパレーターの描画がおかしい

まずはこれを見て欲しい。

f:id:griefworker:20140409194344p:plain

UITableView のセパレーターがおかしなことになっている。 左端に隙間が開いているものもあれば、左端までぴったり線が描画されているものもある。 左端までぴったり線が描画されているものは、線も少し太い。

UITableView の separatorStyle を UITableViewCellSeparatorStyleNone にしても、左端まで達している線は残る。 カスタムセルを使っているけど、border を設定してはいない…。

ほとんど諦めかけていたんだけど、ふと 「行の高さがおかしいのかも」と思って、行の高さをコンソールに出力してみたら

123.789993286133
123.789993286133
123.789993286133
123.789993286133
123.789993286133
123.789993286133

案の定、浮動小数点数ばっかり。 試しに round で小数点以下を切り上げてみたら

f:id:griefworker:20140409194418p:plain

変な線が表示されなくなった! 原因に気付くまでに2日かかってしまったよ…。解決してよかった。

RubyMotion でリポジトリに含めたくない設定を外部ファイルに抜き出す

Web API の consumer_key と consumer_secret のような、 人に知られたくないキーは Git リポジトリに含めたくない。 そこでキーを git リポジトリ管理外の設定ファイルに抜き出すことにした。

設定ファイルを読み込んで RubyMotion でいい感じに扱うための gem で RubyMotion Wrappers に載っているのは、motion-config-vars ていうやつ。

motion-cofnig-vars

resources/app.yml に

API_ENV:
  development:
    cosumer_key: "hogehoge"
    consumer_secret: "fugafuga"
  test:
    cosumer_key: "hogehoge"
    consumer_secret: "fugafuga"
  production:
    cosumer_key: "hogehoge"
    consumer_secret: "fugafuga"

って書いて、

bundle exec rake API_ENV=development

で実行すれば、development 以下の設定を ENV にセットしてくれる。 ただ、API_ENV を毎回指定するのが面倒。おしい。

RubyMotion Wrappers には載ってない gem

motion-mode 作者でもある ainame 氏が作った motio-my_env がある。 Watson 氏が作った motion-env-vars もある。

自分は motion-my_env を使ってる。 motion-env-vars は最近知ったのでまだ試していない。 README 読んだ感じだと、使い方同じっぽい。

motion-my_env

config/environment.yaml に設定を書いて

hatena:
  consumer_key: "hogehoge"
  consumer_secret: "fugafuga"

Rakefile 内で yaml ファイルのパスを指定する。

Motion::Project::App.setup do |app|
  # ...

  app.my_env.file = "./config/environment.yaml"

  # ...
end

するとアプリ内で

MY_ENV["hatena"]["consumer_key"] # => hogehoge

という風にアクセスできる。 YAML をパースした結果が MY_ENV 定数に格納されるようだ。

MBProgressHUD を使ったローディング表示

iOS アプリがサーバーと通信している間ローディング表示を出すために、 MBProgressHUD を導入することにした。

MBProgressHUD の基本的な使い方。 まずサブビューに追加し、

self.hud = [[MBProgressHUD alloc] initWithView:self.view];
[self.view addSubview:self.hud];

メッセージをセットして表示。

self.hud. labelText = @"Logding...";
[self.hud show:YES];

閉じるときは

[self.hide hide:YES];

で OK。

MBProgressHUD *hud = [MBProgressHUD showHUDAddedTo:self.view animated:YES];

でも表示できるけど、中で勝手にサブビューに追加されるのが気に入らない。 ViewController 内で使いまわしたいので、メンバとして保持するようにしている。

MBProgressHUD が提供するのは、ローディング表示して閉じるだけ。 似た名前の SVProgressHUD みたいに、成功や失敗を表示する気の利いた機能は提供していない。 その代わりカスタムビューをセットできるから、自分で画像なり表示しろ、って感じだ。

SVProgressHUD っぽく使いたいので、自分は下記のようなカテゴリを作っている。

#import "MBProgressHUD.h"

@interface MBProgressHUD (Utils)

- (void)showWithStatus:(NSString*)string;
- (void)showSuccessWithStatus:(NSString*)string;
- (void)showErrorWithStatus:(NSString*)string;

@end
#import "MBProgressHUD+Utils.h"

@implementation MBProgressHUD (Utils)

- (void)showWithStatus:(NSString *)string
{
    self.labelText = string;
    self.mode = MBProgressHUDModeIndeterminate;
    [self show:YES];
}

- (void)showErrorWithStatus:(NSString *)string
{
    FAKIcon *icon = [FAKIonIcons ios7CloseIconWithSize:28];
    [icon addAttribute:NSForegroundColorAttributeName value:[UIColor whiteColor]];
    UIImage *image = [icon imageWithSize:CGSizeMake(28, 28)];
    UIImageView *imageView = [[UIImageView alloc] initWithImage:image];
    self.labelText = string;
    self.mode = MBProgressHUDModeCustomView;
    self.customView = imageView;
    [self hide:YES afterDelay:2.0];
}

- (void)showSuccessWithStatus:(NSString *)string
{
    FAKIcon *icon = [FAKIonIcons ios7CheckmarkIconWithSize:28];
    [icon addAttribute:NSForegroundColorAttributeName value:[UIColor whiteColor]];
    UIImage *image = [icon imageWithSize:CGSizeMake(28, 28)];
    UIImageView *imageView = [[UIImageView alloc] initWithImage:image];
    self.labelText = string;
    self.mode = MBProgressHUDModeCustomView;
    self.customView = imageView;
    [self hide:YES afterDelay:2.0];
}

@end

成功・失敗で表示するアイコンは FontAwesomeKit のものを使用。

使い方はこんな感じ。

[self.hud showWithStatus:@"Loading..."];
[self.hud showSuccessWithStatus:@"Success"];

AFNetworking 2.x の AFHTTPRequestOperationManager でベーシック認証に対応する

ベーシック認証のユーザー名とパスワードは、AFHTTPRequestSerializer にセットすればいい。

AFHTTPRequestOperationManager *manager = [[AFHTTPRequestOperationManager alloc] initWithBaseURL:url];
manager.requestSerializer = [[AFHTTPRequestSerializer alloc] init];
[manager.requestSerializer setAuthorizationHeaderFieldWithUsername:userName password:password];

AFHTTPClient から AFHTTPRequestOperationManager への移行は、思っていたよりスンナリ終わったな。

Objective-C コードで Auto Layout を設定するためのライブラリを書いた

Xcode 5 になって、InterfaceBuilder や Storyboard で Auto Layout を設定しやすくなったけど、 コードで Auto Layout 設定したいときが稀にある。 例えば自分の場合、継承して使いまわすことを前提に View や ViewController のベースクラスを作るときとか。

一度 Auto Layout の便利さを体感したら、もう Frame を設定してまわるなんてやってられなくなる。 かといって、Auto Layout をコードで記述するのもなかなか苦行。 RubyMotion の motion-layout みたいに、良い感じにラップしたライブラリがあれば、少しは楽になるのに。 そう思ったんで、Objective-C にポートしてみた。

使い方は次の通り。

@interface TNAViewController ()

@property (nonatomic) TNALayoutManager *layoutManager;

@end

@implementation TNAViewController

- (void)viewDidLoad
{
    [super viewDidLoad];

    UIButton *button1 = [UIButton buttonWithType:UIButtonTypeSystem];
    button1.backgroundColor = [UIColor blueColor];
    [button1 setTitle:@"button1" forState:UIControlStateNormal];
    [self.view addSubview:button1];

    UIButton *button2 = [UIButton buttonWithType:UIButtonTypeSystem];
    button2.backgroundColor = [UIColor yellowColor];
    [button2 setTitle:@"button2" forState:UIControlStateNormal];
    [self.view addSubview:button2];

    self.layoutManager = [[TNALayoutManager alloc] init];
    self.layoutManager.view = self.view;
    self.layoutManager.subviews = @{ @"button1": button1,
                                     @"button2": button2, };
    [self.layoutManager vertical:@"|-15-[button1]-10-[button2(==button1)]-15-|"];
    [self.layoutManager horizontal:@"|-10-[button1]-10-|"];
    [self.layoutManager horizontal:@"|-10-[button2]-10-|"];
    [self.layoutManager strain];
}

@end

motion-layout とほとんど変わらない。 実際にシミュレーターで表示してみたのがこちら。

f:id:griefworker:20140308091934p:plain

横にしても

f:id:griefworker:20140308091947p:plain

ばっちり配置されてる。

Podspec を用意したので、Podfile に

pod "TNALayoutManager", git: "https://github.com/tnakamura/TNALayoutManager.git"

って書けば CocoaPods でインストールできる。 CocoaPods のおかげで、オレオレライブラリが簡単に再利用できて開発が捗るな。

2016/10/27 追記

iOS 9 から NSAutoLayoutAnchor を使えば簡単に Auto Layout をコードで書けるようになったので、 自作ライブラリは使わなくなった。

保守するつもりもないので公開停止。

AutoLayout で UIImageView の幅を固定したのに横長の画像を表示すると幅が変わってしまう

  • AutoLayout で UIImageView の幅を 80 に固定
  • UIImageView の contentMode は UIViewContentModeScaleAspectFill

このとき、縦よりも横の幅がかなり長い画像を表示すると、UIImageView の幅が変わってしまった。

調べたところ、縦横のアスペクト比が違う場合、その分はみ出てしまうようだ。 UIImageView の幅が変わったんじゃなくて、画像がはみ出て描画されていたのか。 確かに、UIImageView の右端を基準に配置したラベルの位置は変わっていなかった。

UIImageView から画像がはみ出てほしくないから、

self.imageView.clipToBounds = YES;

で UIImageView の bounds のみ描画されるようにして対処。