はじめに
JavaScript でテストするためのフレームワークは QUnit と Jasmine が人気を二分していたみたいですが、最近は Jasmine が優勢?雑誌やブログで Jasmine を推しているのをよく見かけました。中には「QUnit はオワコン。これからは Jasmine!」って感じの過激な意見も。
私は QUnit を使ってきましたが、Jasmine の勢いは見逃せない。

ってわけで Jasmine 試してみます。どちらが優れているかは、実際に使ってみないと分からないですから。
Jasmineについて
RSpec 風に記述できる、JavaScript のテスティングフレームワーク。スタンドアロン版とRuby版とNode版があります。スタンドアロン版は QUnit 同様に、ブラウザで実行するタイプ。Ruby 版と Node 版は、なんとコマンドラインから実行できます。
コマンドラインから実行できるということは…Jenkins のジョブに組み込めるかも!?オラ、ワクワクしてきたぞ。
スタンドアロン版を試してみる
スタンドアロン版の入手
下記のページで、スタンドアロン版 Jasmine 一式をダウンロードできます。
ダウンロードしたファイルは適当なディレクトリに解凍します。中身はこんな感じ。
C:.
└─lib
    └─jasmine-1.1.0
            jasmine-html.js
            jasmine.css
            jasmine.js
            jasmine_favicon.png
            MIT.LICENSE
Product.js を作成
テストを書くには、対象のクラスが必要なわけで。
var Product = function(name, price) {
    if (!name) {
        throw "name is required!";
    }
    if (!price) {
        throw "price is required!";
    }
    this.name = name;
    this.price = price;
};
Product.prototype.calcTax = function() {
    return this.price * 0.05;
};
Product.prototype.getPriceWithTax = function() {
    return this.price + this.calcTax();
};
このクラスのテストを書きます。
テストを記述
spec ディレクトリを作って、その下に ProductSpec.js を作ります。ProductSpec.js の内容は次の通り。
describe("Product クラスは", function() {
    var product = null;

    // it の前に実行される
    beforeEach(function() {
        product = new Product("foo", 100);
    });

    // it の後に実行される
    afterEach(function() {
        product = null;
    });

    it("price を null にするとエラーが発生する", function() {
        expect(function() {
            new Product("foo", null);
        }).toThrow("price is required!");
    });

    it("name プロパティで名前を変更できる", function() {
        product.name = "bar";
        expect(product.name).toEqual("bar");
    });

    it("price プロパティで価格を変更できる", function() {
        product.price = 200;
        expect(product.price).toEqual(200);
    });

    it("calcTax メソッドで消費税を取得できる", function() {
        expect(product.calcTax()).toEqual(5);
    });

    it("getPriceWithTax メソッドで税込の価格を取得できる", function() {
        expect(product.getPriceWithTax()).toEqual(105);
    });

    it("name を null にするとエラーが発生する", function() {
        expect(function() {
            new Product(null, 100);
        }).toThrow("name is required!");
    });
});
Jasmine を使って書いたテストは、確かに RSpec で書いたテストによく似てますね。
また、describe は入れ子にできるから、状態でグループ分けできます。Backbone.js や Knockout.js で作成したアプリと相性良さそう。実際 Knocout アプリのテストが書きやすかったです。経験者談。
SpecRunner を作成
テストを実行するための HTML ファイルが必要なんですが、スタンドアロン版の ZIP には入っていませんでした。仕方ないので、ネットの情報を参考に SpecRunner.html を作成します。
<!DOCTYPE html>
<html>
    <head>
        <title>Jasmine Test Runner</title>
        <meta charset="utf-8"/>
        <link rel="stylesheet" type="text/css" href="lib/jasmine-1.1.0/jasmine.css">
        <script type="text/javascript" src="lib/jasmine-1.1.0/jasmine.js"></script>
        <script type="text/javascript" src="lib/jasmine-1.1.0/jasmine-html.js"></script>

        <!-- include spec files here... -->
        <script type="text/javascript" src="Product.js"></script>
        <script type="text/javascript" src="spec/ProductSpec.js"></script>
    </head>
    <body>
       <script type="text/javascript">
            jasmine.getEnv().addReporter(new jasmine.TrivialReporter());
            jasmine.getEnv().execute();
        </script>
    </body>
</html>
多分これでいいはず。SpecRunner.html のスケルトンをスタンドアロン版に同梱してくれればいいのに。入れ忘れだったり?
SpecRunner.html をブラウザで表示
この時点で、ディレクトリ構成はこんな感じになりました。
C:.
│  Product.js
│  SpecRunner.html
│
├─lib
│  └─jasmine-1.1.0
│          jasmine-html.js
│          jasmine.css
│          jasmine.js
│          jasmine_favicon.png
│          MIT.LICENSE
│
└─spec
        ProductSpec.js
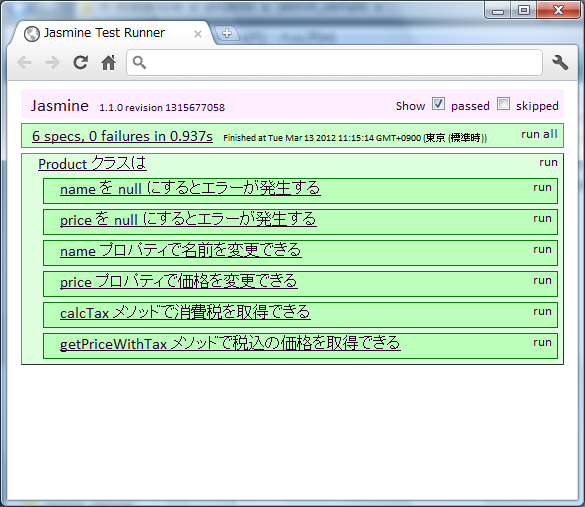
SpecRunner.html をブラウザで開くと

テストの実行結果が出力されています。すべて成功してますね。describe や it に渡す文字列を工夫したので、クラスの振る舞いが分かるようになっています。スバラシイ。
RubyGem 版も試してみる
Jasmin の RubyGem をインストール
Jasmin は RubyGem が公開されているので、gem install コマンドでインストールできます。でも、私は RubyGem をプロジェクト内にダウンロードしたい派なので、Bundler を使います。
まず Gemfile を作成。
source :rubygems

gem 'jasmine'
gem 'rake'
そして、Jasmine の RubyGem をインストール。
bundle install ./vendor/bundle
テスト用ファイル生成
bundle exec jasmin init
を実行すると次のような、Jasmine を使ってテストを実行するために必要なファイルと、テストのサンプルが生成されます。
C:.
│  Gemfile
│  Gemfile.lock
│  Rakefile
│
├─.bundle
│      config
│
├─public
│  └─javascripts
│          Player.js
│          Song.js
│
├─spec
│  └─javascripts
│      │  PlayerSpec.js
│      │
│      ├─helpers
│      │      SpecHelper.js
│      │
│      └─support
│              jasmine.yml
│              jasmine_config.rb
│              jasmine_runner.rb
│
└─vendor
    └─bundle
        └─ここから下は gem のディレクトリなので省略
jasmine.yml で、テストを実行するときに読み込むソースファイルを指定しています。
# src_files
#
# Return an array of filepaths relative to src_dir to include before jasmine specs.
# Default: []
#
# EXAMPLE:
#
# src_files:
#   - lib/source1.js
#   - lib/source2.js
#   - dist/**/*.js
#
src_files:
    - public/javascripts/**/*.js

# stylesheets
#
# Return an array of stylesheet filepaths relative to src_dir to include before jasmine specs.
# Default: []
#
# EXAMPLE:
#
# stylesheets:
#   - css/style.css
#   - stylesheets/*.css
#
stylesheets:

# helpers
#
# Return an array of filepaths relative to spec_dir to include before jasmine specs.
# Default: ["helpers/**/*.js"]
#
# EXAMPLE:
#
# helpers:
#   - helpers/**/*.js
#
helpers:

# spec_files
#
#  Return an array of filepaths relative to spec_dir to include.
# Default: ["**/*[sS]pec.js"]
#
# EXAMPLE:
#
# spec_files:
#   - **/*[sS]pec.js
#
spec_files:

# src_dir
#
# Source directory path. Your src_files must be returned relative to this path. Will use root if left blank.
# Default: project root
#
# EXAMPLE:
#
# src_dir: public
#
src_dir:

# spec_dir
#
# Spec directory path. Your spec_files must be returned relative to this path.
# Default: spec/javascripts
#
# EXAMPLE:
#
# spec_dir: spec/javascripts
#
spec_dir:
どうやら、テスト対象のクラスは public/javascript に配置し、テストは spec/javascript に配置すればいいみたいです。
テストを実行
スタンドアロン版を試したときに作成したテストを流用します。モッタイナイ。Product.js を public/javascript に移動し、ProductSpec.js を spec/javascript に移動します。あと、jasmin init で生成されたテストのサンプルは削除。
以上を行ったディレクトリ構成はこんな感じ。
C:.
│  Gemfile
│  Gemfile.lock
│  Rakefile
│
├─.bundle
│      config
│
├─public
│  └─javascripts
│          Product.js
│
├─spec
│  └─javascripts
│      │  ProductSpec.js
│      │
│      ├─helpers
│      │      SpecHelper.js
│      │
│      └─support
│              jasmine.yml
│              jasmine_config.rb
│              jasmine_runner.rb
│
└─vendor
    └─bundle
        └─ここから下は gem のディレクトリなので省略
あとは
bundle exec rake jasmin:ci
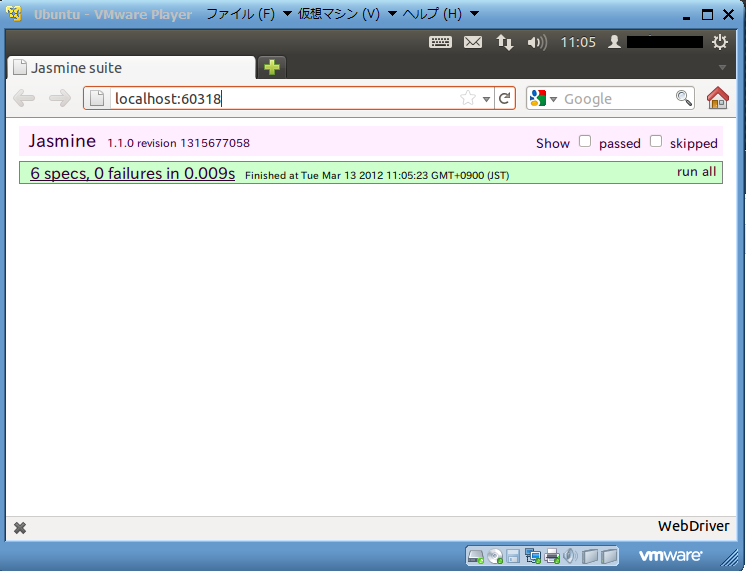
でテストを実行します。すると

という風にブラウザが自動で立ち上がって、テストが実行されて、ブラウザが閉じます。おおお、ブラウザが自動で動いたよ。そういえば Selenium 初めて使ったかも。

