SceneDelegate 時代にコードだけで iOS アプリを実装し始める手順

iOS 13 で SceneDelegate が導入されて、Storyboard を使わずコードだけで iOS アプリを開発し始める手順が変わっていたのでメモ。

まず、メインインタフェースを空にする。これは以前と同じ。

f:id:griefworker:20210214213822p:plain

Info.plist の UISceneStoryboardFile を削除。

f:id:griefworker:20210214213838p:plain

SceneDelegate にウィンドウを表示する処理を記述。以前は AppDelegate に書いていたものが、こっちに移動してきた感じ。

using Foundation;
using UIKit;

namespace HelloSceneDelegate
{
    public class Application
    {
        static void Main(string[] args)
        {
            UIApplication.Main(args, null, "AppDelegate");
        }
    }

    [Register("SceneDelegate")]
    public class SceneDelegate : UIResponder, IUIWindowSceneDelegate
    {
        [Export("window")]
        public UIWindow Window { get; set; }

        [Export("scene:willConnectToSession:options:")]
        public void WillConnect(UIScene scene, UISceneSession session, UISceneConnectionOptions connectionOptions)
        {
            if (scene is  UIWindowScene windowScene)
            {
                var window = new UIWindow(windowScene: windowScene);
                Window = window;
                window.RootViewController = new UINavigationController(
                    new UIViewController
                    {
                        Title = "HelloSceneDelegate",
                    });
                window.MakeKeyAndVisible();
            }
        }

        [Export("sceneDidDisconnect:")]
        public void DidDisconnect(UIScene scene)
        {
        }

        [Export("sceneDidBecomeActive:")]
        public void DidBecomeActive(UIScene scene)
        {
        }

        [Export("sceneWillResignActive:")]
        public void WillResignActive(UIScene scene)
        {
        }

        [Export("sceneWillEnterForeground:")]
        public void WillEnterForeground(UIScene scene)
        {
        }

        [Export("sceneDidEnterBackground:")]
        public void DidEnterBackground(UIScene scene)
        {
        }
    }

    [Register("AppDelegate")]
    public class AppDelegate : UIResponder, IUIApplicationDelegate
    {

        [Export("window")]
        public UIWindow Window { get; set; }

        [Export("application:didFinishLaunchingWithOptions:")]
        public bool FinishedLaunching(UIApplication application, NSDictionary launchOptions)
        {
            return true;
        }

        // UISceneSession Lifecycle

        [Export("application:configurationForConnectingSceneSession:options:")]
        public UISceneConfiguration GetConfiguration(UIApplication application, UISceneSession connectingSceneSession, UISceneConnectionOptions options)
        {
            return UISceneConfiguration.Create("Default Configuration", connectingSceneSession.Role);
        }

        [Export("application:didDiscardSceneSessions:")]
        public void DidDiscardSceneSessions(UIApplication application, NSSet<UISceneSession> sceneSessions)
        {
        }
    }
}

Xamarin.iOS での Microsoft.Data.Sqlite の利用

Microsoft.Data.Sqlite は、Xamarin で SQLite を使うときの定番になっている sqlite-net-pcl と同じく、SQLitePCL.raw に依存している。 sqlite-net-pcl が Xamarin.iOS で利用できるということは、Microsoft.Data.Sqlite も利用できるに違いない。

サンプルを書いて試してみた。

using System;
using System.Collections.Generic;
using System.IO;
using Foundation;
using Microsoft.Data.Sqlite;
using UIKit;
using Xamarin.Essentials;

namespace HelloSqlite
{
    public class Application
    {
        static void Main(string[] args)
        {
            UIApplication.Main(args, null, "AppDelegate");
        }
    }

    [Register("AppDelegate")]
    public class AppDelegate : UIApplicationDelegate
    {
        public override UIWindow Window { get; set; }

        public override bool FinishedLaunching(UIApplication application, NSDictionary launchOptions)
        {
            SQLitePCL.Batteries_V2.Init();

            Window = new UIWindow(UIScreen.MainScreen.Bounds);
            Window.RootViewController = new UINavigationController(
                new ItemsViewController());
            Window.MakeKeyAndVisible();

            return true;
        }
    }

    public class Item
    {
        public int Id { get; set; }

        public string Content { get; set; }
    }

    public class ItemsViewController : UITableViewController
    {
        List<Item> items = new List<Item>();

        public ItemsViewController()
            : base(UITableViewStyle.Plain)
        {
            Title = "HelloSqlite";
        }

        public override void ViewDidLoad()
        {
            base.ViewDidLoad();

            NavigationItem.RightBarButtonItem = new UIBarButtonItem(
                UIBarButtonSystemItem.Add, HandleAdd);

            CreateTable();
            LoadItems();
        }

        public override nint RowsInSection(UITableView tableView, nint section)
        {
            return items.Count;
        }

        public override UITableViewCell GetCell(UITableView tableView, NSIndexPath indexPath)
        {
            const string cellId = "ItemCell";
            var cell = tableView.DequeueReusableCell(cellId) ??
                new UITableViewCell(UITableViewCellStyle.Default, cellId);
            var item = items[indexPath.Row];
            cell.TextLabel.Text = item.Content;
            return cell;
        }

        void HandleAdd(object sender, EventArgs e)
        {
            AddItem();
            LoadItems();
        }

        void CreateTable()
        {
            using (var connection = CreateConnection())
            {
                connection.Open();
                using (var command = connection.CreateCommand())
                {
                    command.CommandText = @"
                        CREATE TABLE IF NOT EXISTS items (
                            id INTEGER NOT NULL PRIMARY KEY AUTOINCREMENT,
                            content TEXT NOT NULL
                        );";
                    command.ExecuteNonQuery();
                }
            }
        }

        void AddItem()
        {
            using (var connection = CreateConnection())
            {
                connection.Open();
                using (var command = connection.CreateCommand())
                {
                    command.CommandText = $@"
                        INSERT INTO items (
                            content
                        ) VALUES (
                            '{DateTime.Now}'
                        )";
                    command.ExecuteNonQuery();
                }
            }
        }

        void LoadItems()
        {
            var nextItems = new List<Item>();
            using (var connection = CreateConnection())
            {
                connection.Open();
                using (var command = connection.CreateCommand())
                {
                    command.CommandText = @"
                        SELECT id, content
                        FROM items
                        ORDER BY id";
                    using (var reader = command.ExecuteReader())
                    {
                        while (reader.Read())
                        {
                            var item = new Item
                            {
                                Id = reader.GetInt32(0),
                                Content = reader.GetString(1),
                            };
                            nextItems.Add(item);
                        }
                    }
                }
            }

            items = nextItems;
            TableView.ReloadData();
        }

        SqliteConnection CreateConnection()
        {
            var builder = new SqliteConnectionStringBuilder();
            builder.DataSource = Path.Combine(
                FileSystem.AppDataDirectory,
                "HelloSqlite.db");
            return new SqliteConnection(builder.ToString());
        }
    }
}

iOS のシミュレーターだと動的コード生成を行うプログラムであっても動かせてしまうので、実機で動くことを確認するまでは安心できない。

このサンプルを実機に転送して実行したところ、期待通り SQLite データベースにデータを登録できた。

Microsoft.Data.Sqlite が使えたということは、 ADO.NET の抽象化の上に構築されたライブラリが Xamarin.iOS でも使える、 ということになる。 ただし、動的コード生成を行っていなければね。 このあいだ Dapper のソースコードを読んだら DynamicMethod 使っていたんだよなぁ。 残念。

iOS 版 Xamarin.Forms 製アプリの Launch Screen の背景色が白っぽくなる

Xamarin.Forms で開発しているアプリの iOS 版の Launch Screen に LaunchScreen.storyboard を指定し、 デザイナで背景色の RGB 値を設定した。

そしていざデバッグ実行すると、Launch Screen の背景色が実際に設定した色より白っぽく表示されているように見える。 実機でも同じ。

GitHub でイシューを漁ると、この問題に関係ありそうなものを発見。

github.com

このイシューによると、colorSpace が calibratedRGB になっているのが原因。 sRGB を選択することで期待通りの色で表示できるようになった。

f:id:griefworker:20191028213309p:plain:w400

Xamarin.iOS でキーチェーンを有効にする

Xamarin.iOS でアプリを作っていて、キーチェーンを使いたくなったときにいつも嵌るので、有効化の方法をメモしておく。

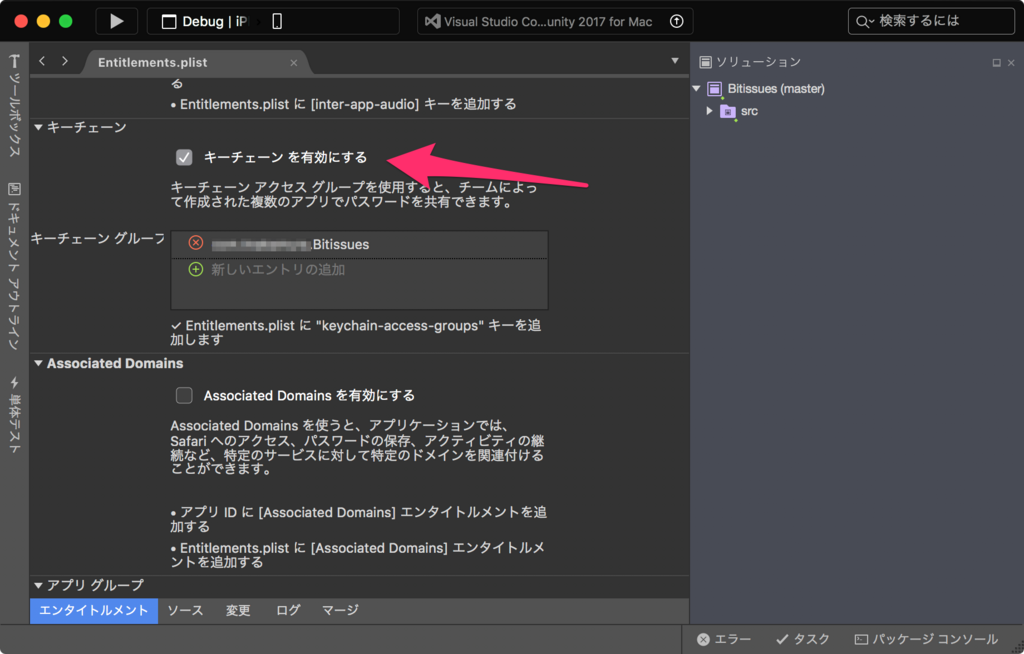
Visual Studio for Mac でプロジェクトを開いている状態で、まずは Entitlements.plist を開き、 「キーチェーンを有効にする」にチェックを入れる。 キーチェーングループの一覧には、アプリのバンドル識別子が含まれているはず。

f:id:griefworker:20180125225427p:plain

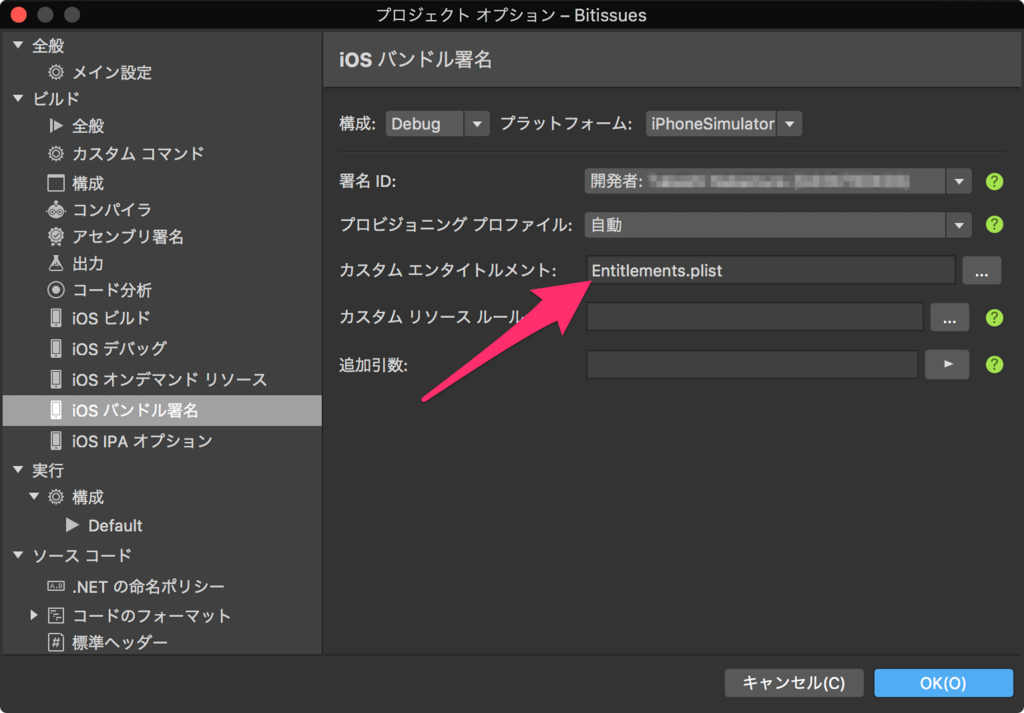
Xamarion.iOS プロジェクトのオプションを開き、iOS バンドル署名を選択。 カスタムエンタイトルメントが空欄になっていた場合は、 プロジェクト内の Entitlements.plist を指定する。

f:id:griefworker:20180125225614p:plain

以上。 あとは Security フレームワークを使って、キーチェーンにアクセスするコードを書けばいい。

UILabel と UITextField を配置したカスタムセルを自作した

登録画面で使うために、UILabel と UITextField を配置したカスタムセルを、コードだけで実装してみた。 Xamarin.Forms なら EntryCell があるけど、あいにく Xamarin.iOS で開発しているアプリなもので。

レイアウトはもちろん AutoLayout を使ってる。ただし、Storyboard を使わず、すべての制約をコードで指定した。Storyboard を使わなかったのは、宗教的な理由。Storyboard を使っていれば簡単に実装できたかもしれないが、すべてコードだと予想以上に苦労した。

using UIKit;

namespace CustomCellSample.Views
{
    public class TextFieldCell : UITableViewCell
    {
        public const string CellId = nameof(TextFieldCell);

        public UITextField TextField { get; }

        public UILabel TitleLabel { get; }

        NSLayoutConstraint TitleLabelWidth { get; }

        public TextFieldCell()
            : this(CellId)
        {
        }

        public TextFieldCell(string reuseIdentifier)
            : base(UITableViewCellStyle.Default, reuseIdentifier)
        {
            SelectionStyle = UITableViewCellSelectionStyle.None;

            TextField = new UITextField();
            TextField.BackgroundColor = UIColor.Yellow; // スクリーンショットでわかるように背景色を黄色にする

            TitleLabel = new UILabel();

            ContentView.AddSubview(TextField);
            ContentView.AddSubview(TitleLabel);

            TextField.TranslatesAutoresizingMaskIntoConstraints = false;
            TitleLabel.TranslatesAutoresizingMaskIntoConstraints = false;

            TextField.LeadingAnchor.ConstraintEqualTo(TitleLabel.TrailingAnchor, 5).Active = true;
            TextField.CenterYAnchor.ConstraintEqualTo(ContentView.CenterYAnchor).Active = true;
            TextField.TrailingAnchor.ConstraintEqualTo(LayoutMarginsGuide.TrailingAnchor).Active = true;

            TitleLabel.LeadingAnchor.ConstraintEqualTo(LayoutMarginsGuide.LeadingAnchor).Active = true;
            TitleLabel.CenterYAnchor.ConstraintEqualTo(ContentView.CenterYAnchor).Active = true;
            TitleLabelWidth = TitleLabel.WidthAnchor.ConstraintEqualTo(50); // とりあえず仮の幅を設定しておく
            TitleLabelWidth.Active = true;
        }

        public override void LayoutSubviews()
        {
            base.LayoutSubviews();

            // 実際に設定された文字列の幅ぴったりにする
            var rect = TitleLabel.SizeThatFits(ContentView.Frame.Size);
            TitleLabelWidth.Constant = rect.Width;
        }
    }
}

こんな感じで表示される。

f:id:griefworker:20171213223737p:plain

UINavigationController の rootViewController を変更する

UINavigationController の setViewControllers メソッドを使って、ごっそり入れ替えればいい。 以下サンプルコード。Xamarin.iOS だけど。

NavigationController.SetViewControllers(
    new [] { newRootViewController },
    animated);

Bitbucket の iOS クライアントは CodeBucket で決まり

Bitbucket の iOS クライアント『CodeBucket』がいつの間にか無料になっていた。

codebucket.dillonbuchanan.com

Bitbucket の iOS クライアントといえば、自分でもイシューに特化した『Bitissues』を作って使っていたけど、無料と知って即 CodeBucket に乗り換えた。

Bitissues を作った理由は、イシューに特化したシンプルなアプリが欲しかったから。でも実は、無料で使える完成度の高い iOS クライアントが無かったから、ってのもある。開発当時すでに CodeBucket が無料だったら、作ってなかった。

懐事情が苦しくて Apple Developer Program 更新してないし、CodeBucket で満足しちゃったから、Bitissues の開発続けるモチベーション無くなったな。他に作りたいものはあるし、そもそも iOS アプリを開発する時間を捻出することも難しい。ソースコード整理して、Github に公開するかな。それすらいつになるかわからないけど。

CodeBucket は Xamarin で作られているのも興味深い。ソースコードはなんと Github に公開されているから、Xamarin で iOS アプリを作るときの良い手本になりそうだ。

github.com